How to fix scratches, dents and imperfections in your car’s paint
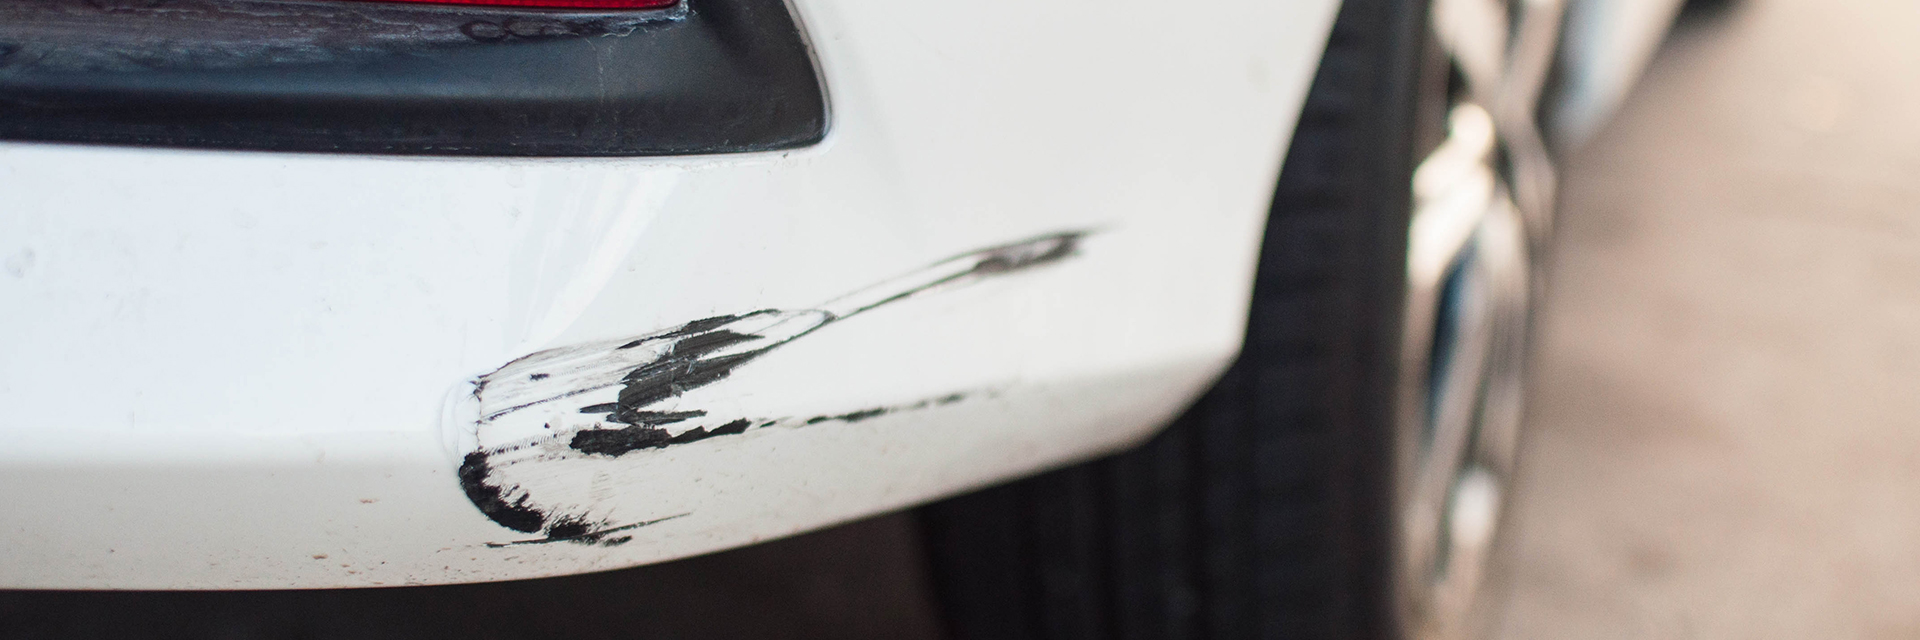
We’d guess just about every motorist has felt it. That sinking feeling in your gut a second after the sound of scraping or banging passes through your car’s cabin. Whether a misjudged parking manoeuvre, getting on the brakes too late, or maybe a pillar you just didn’t see in time, your car now has a brand-new scratch or dent, and your day has been ruined.
Scratches, dents and other imperfections in your car’s paint and body panels are unsightly, but don’t assume what’s done is done and ignore them. At best, some scratches and dents can be easily remedied; at worst, they can turn into more serious problems if left unattended.
We look at some of the easier do-it-yourself ways to deal with scratches and dents in your car, and what do if the damage has exceeded the realm of a DIY fix.
How to fix scratches in your paint
To understand how to DIY fix a scratch or imperfection in your car’s paint, it’s important to first understand how car paint works.
Automotive paint generally exists in three layers:
- Primer/under coat: Applied directly to body panels to protect them from contaminants, air and moisture, and to improve adhesion of the colour/base coat.
- Colour/base coat: The colour added on top of primer/undercoat and what you see when looking at your car.
- Clear/top coat: A layer of clear paint added over your colour/base coat that gives it hardness, shine and UV protection.
Knowing how serious a scratch is – and how involved its repair will have to be – depends on how many of these three layers have been affected.
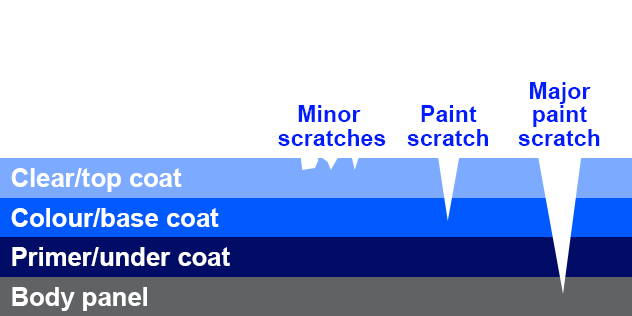
Above: diagram showing order of paint layers and severity of scratches
How deep is the scratch? The easiest way to tell is by checking to see whether the colour below has been disrupted. If the colour is gone and the scratch has exposed a grey or beige beneath, it has likely gone through to the undercoat. If you can see black plastic or metal, the damage is even worse.
How to fix scratches in clearcoat
As the protective coating and hardest-wearing layer of your car’s paintjob, many scratches form within the clearcoat and don’t make their way to layers beneath.
If the scratch is contained within your clearcoat, that means it can be buffed out using a polishing or cutting compound, or a combination of both. Think of it like toothpaste, with thousands of small, abrasive grits dispersed through a paste that is rubbed against the paint.
Like sandpaper, compounds are measured by how rough they are: higher-grit pastes have smaller but more plentiful abrasives, producing more shine and lustre than their lower-grit counterparts, but with less ability to cut through clearcoat.
Keep in mind that these compounds are ‘cutting’ through the finite amount of clearcoat your car has, so you only want to remove as much clearcoat as is necessary to remove the scratch. Because of this, it’s wise to start with the least aggressive compound you can and work your way up until you find one able to remove the scratch. This will result in as much clearcoat being saved as possible.
How to fix scratches in colour basecoat
If the scratch has damaged your colour basecoat and/or made its way to or through your primer/undercoat, then simply buffing the area won’t be enough for repair, and colour will need to be replaced.
Colour can be replaced in a few ways, but the most common for DIYers is to apply a colour-matched paint from a touch-up pen or spray can.

Above: fine scratches and general hazing removed from clearcoat with polishing
Many auto stores, such as Repco, sell both off-the-shelf pens and spray cans matched to manufacturer paint specifications – all you’ll need is to grab your colour code (generally found on a sticker in either the engine bay or door sill).
RELATED: NRMA members save on parts at Repco
Both touch-up pens and spray cans have their benefits, and which one you select should be based on the damage, the desired finish, and how much time you’re willing to put into the repair.
How to fix scratches with a touch-up pen
Touch-up pens are great for thin and deep grazes or stone chips, where the surface area of the scratch remains relatively minimal. Being ‘drawn’ onto the car’s body, the paint will not be applied perfectly smoothly, and each stroke will become more apparent over a larger area of repair. For an improved result, touch-up pen repairs can be polished with the same compounds mentioned above, to get a smoother, more glassy finish.
Ensure the scratch is free from burrs and debris, and clean away all oils and other residue to ensure good paint adhesion. A light sandpaper and regular rubbing alcohol are generally fine to prepare the surface.
How to fix scratches with a spray can
For wider scratches or larger sections of damaged paint, your best bet might be moving to a spray can. Because they apply paint colour in a mist, spray cans deliver a much smoother finish than what’s possible with a pen, making them the go-to for larger areas of repair.
Using a spray can will generally result in overspray (a fine mist of paint that carries through the air and sticks to whatever it lands on), meaning the parts of the car you’re not repairing will need to be masked up or covered.
As above, make sure the area you plan to paint is smooth, free of debris and cleaned of all oils and residue. Shake the can thoroughly and work with the nozzle about 25-30cm from the panel, making passes back and forth, overlapping them by roughly half as you move across the panel.
Don’t try to get all the colour onto the panel in a single pass, as too much paint will cause runs and can ruin the finished result. Instead, look to slowly build up the colour over 3-5 passes, allowing adequate time in between.
Not sure when the paint is ready for another pass? Paint will ‘flash off’ and become tacky as its solvents evaporate, giving the paint a more matte finish and signifying it’s ready for another coat.
Try to avoid painting heavily at masked edges, as this will build up paint aggressively and result in a visible ‘lip’ of new paint when masking tape is removed. Instead, try to ‘blend’ the paint thinner between the repair section and the masked area. It’s always a good idea to practice your technique on a bit of scrap cardboard before attacking the actual repair.
It’s important to keep in mind that a paint’s shine and lustre are provided by the clearcoat, not the colour. For a proper, shiny finish, a few layers of clearcoat will need to be applied (and polished) on top of the base coat. Clearcoat should be applied 24-48 hours after colour, and it’s a good idea to give the painted surface another light clean to remove residue and help the clearcoat adhere.
How to fix very deep car paint scratches
As well as looking good, your car’s paint is primarily designed to protect the surfaces below. If a deep scratch has passed through all the paint layers, it’s important to know what material the now-exposed panel is made of. Plastic and aluminium panels can be left exposed, as they either don’t corrode in the elements or do so very slowly. If the panel is steel, however, it’s wise to act quickly.
Steel can oxidise and rust quickly if left exposed to the elements, especially salt and water. While a full-blown paint repair may not be required, it’s important to seal the metal before rust begins – once it has started, it can continue to spread even under a painted panel.
A few coats of primer will help seal the metal. If light corrosion has already begun to form, it can generally be sanded off or treated with a rust converter product. If you’re unsure, take the car to a body repair shop for a professional opinion about how dire the situation might be.
Still feel like a paint repair is a bit out of your depth? NRMA members save with Clipped Assist mobile paint repair.
How to fix dents in your car
In the same way a scratch is a surface imperfection in your car’s paint, a dent is a surface imperfection in the panel underneath.
Given how thin automotive paint is, a dent cannot be ‘buffed out’ in the same manner and will instead require the panel itself to be reshaped. There are a few approaches to this.
How to DIY repair a car panel dent
Car dents are generally formed by two components: a depression (where the panel has been pushed in), and a projection (where the panel has been pushed out).
To achieve a flawless finish, both need to be addressed. When it comes to this, it’s as simple (and sometimes complicated) as raising the depression and lowering the projection.
Repairing a panel dent with body filler
For smaller repairs – such as light hail damage or scratches that have cut into the material of the panel – body filler might be your best bet.
Body filler is a malleable paste designed to chemically cure into a hard surface which can then be sanded and painted.
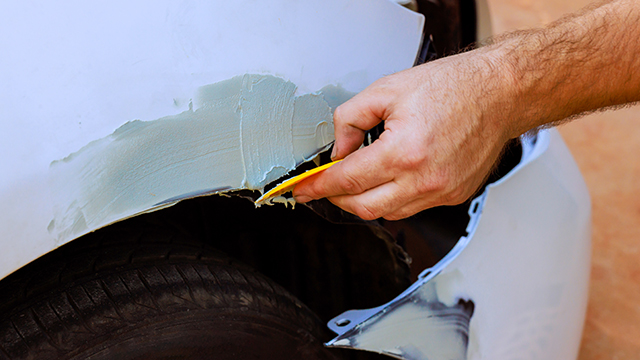
Above: body filler being applied to a damaged panel
Whether filler is being applied to existing paint or an exposed panel, the surface should be roughened with course sandpaper (around 120-grit) to increase surface. Cleaning to promote adherence should follow, and manufacturer instructions about mixing the filler’s chemical components should always be heeded.
Apply filler so that it sits slightly proud of the damaged area onto a well-cleaned panel and allowed to fully cure/harden before using sandpaper to shape the filler until a smooth finish is achieved. We recommend starting with 180-grit for the initial shaping and moving to 240-grit for finer and final shaping.
If the paint or panel underneath is exposed before an acceptable finish is achieved, thoroughly clean the area, apply more filler, and repeat the process. As detailed above, once filler has reached the desired shape, apply primer, base coat and clear on top.
Repairing a panel with paintless dent removal (PDR)
If your panel has been damaged but its paint remains intact, it’s worthwhile considering paintless dent removal – also known as PDR.
This specialist-only technique requires the use of a plethora of hammers, wedges and other tools to effectively reshape a panel to its original contour without the need to add filler or any new paint.
While not cheap, it can result in a flawless finish while maintaining the panel’s original paint – removing the risk of a mismatched or rough paint finish.


